Developer Log
The Climb Tutorial
- Lets Make the hanging system for our game. First open up the project settings
- In there find the input tab

3. add your jump button, and while we're here add a grab button, I prefer to have it on the right mouse button
4. now that we have the inputs lets find the collision tab
5. we are going to add a new trace channel, when added call it LedgeTrace
4. now that we have the inputs lets find the collision tab
5. we are going to add a new trace channel, when added call it LedgeTrace

6. now we can start making the Blueprint, so open up the Third Person Character
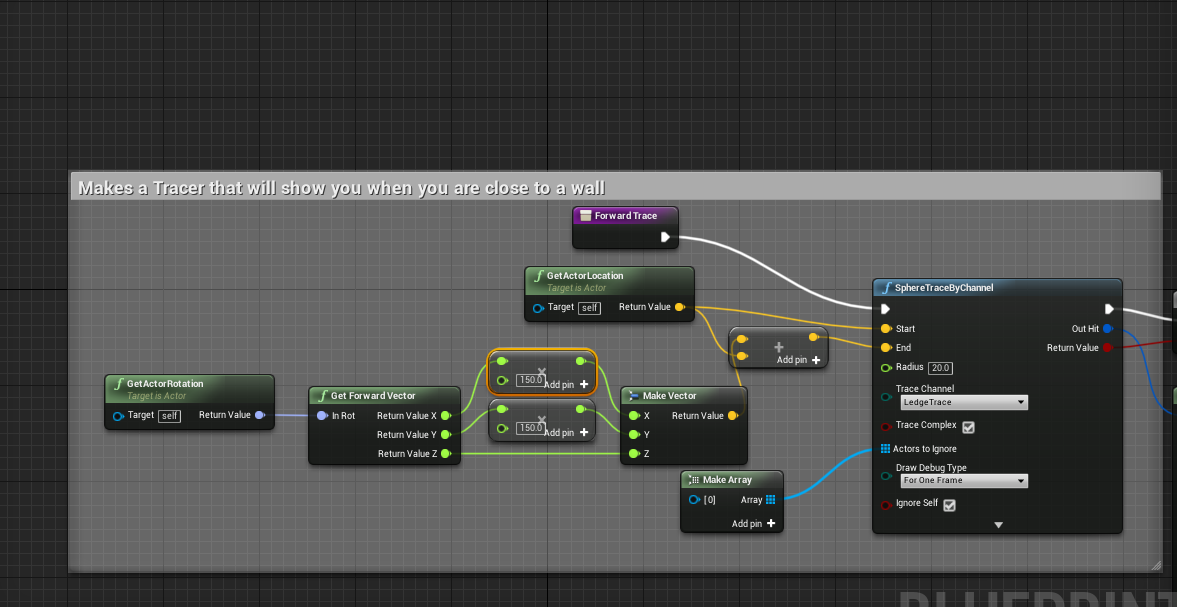
7. we are going to make two functions, name them "Forward Trace" and
"Height Trace"
8. lets start with the forward trace. Whats happening here is that we are making a capsule that will detect the LedgeTrace collision in Unreal so that we don't have to make multiple Blueprints.
The Forward Trace tracks where the wall is and the Height Trace Tracks where the ledge is located
Whats happening here is that we're always tracking the characters location and rotation so that we can track a collision
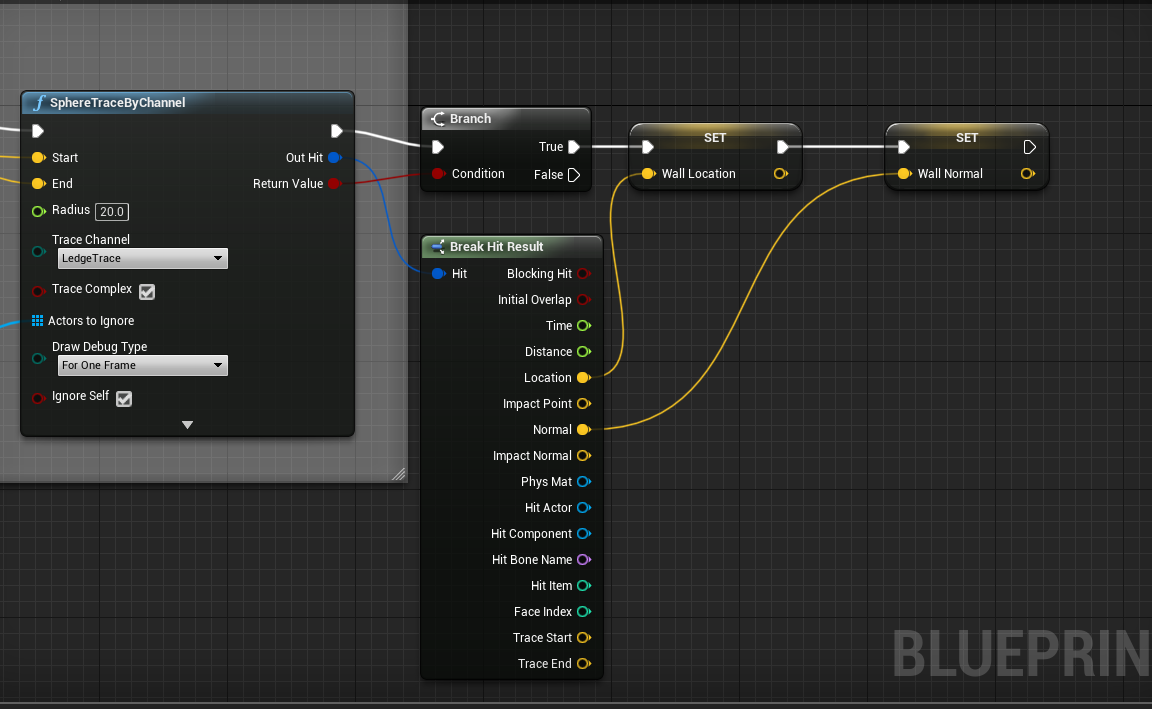
9. with this lets add two vector variables. we'll name them "Wall Location" and
"Wall Normal"
10. Now we're going to add a branch after the sphere trace channel, hook up the return value to the condition as well.
11. set the "Wall Location" to the True Branch and then set the "Wall Normal" after it. We don't need to set the false branch
12. drag out the "Out Hit" node from the sphere trace and add "Break Hit Result" once you do, plug the location node to the "Wall Location" and normal to our "Wall Normal"
13. time for the Height Tracer. open it up and add GetActorLocation, and Grab GetActorRotation. The blueprint is similar with some notable differences
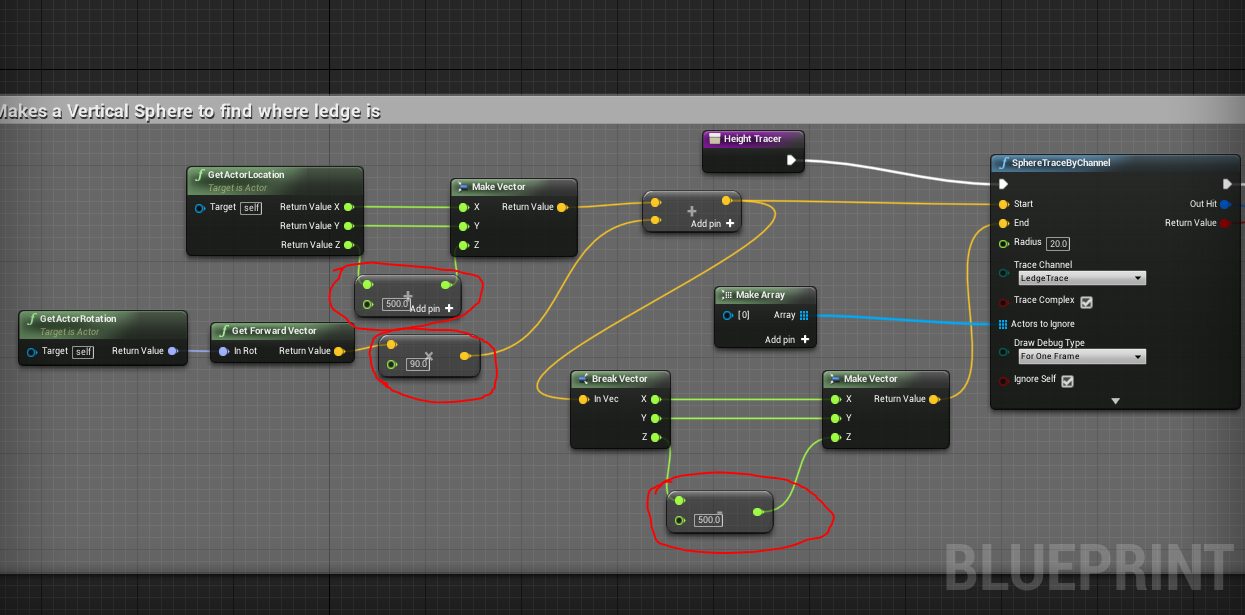
What i have Highlighted are key to the height tracer, the number after the forward vector places the vertical capsule in front of you by the distance you set, and the two other values are before a make vector, those make the bottom and top location for the capsule. if its too low then you won't be able to track a ledge
14. we're going to make two more variables, one vector named "HeightLocation", and one boolean named "IsClimbingLedge"
15. we're going to branch like we did with the forward vector, as well as use the break hit result, but this time in the branches true we with set the HeightLocation variable there and plug it into the location.
16. after we will branch again and leave it for now and later we will add a climb ledge input there
Lets move onto the hanging BP
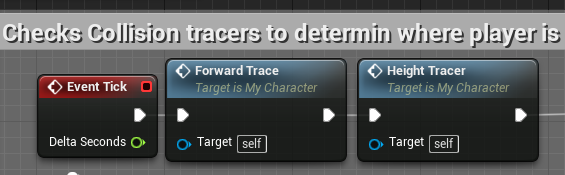
17. Lets go to the event graph of the blueprint, now lets add an event tick, we will connect the tick to the forward trace and height trace so that it is active on the character
18. Now we're going to make a blueprint interface so back in the content browser, right click and in the blueprint tab add blueprint interface. open it up.
19. this part is needed if you want animations to play for your characters. Add a new function in the interface and name it CanGrab_BI. after if you compile and go down to the inputs tab at the bottom rename that to CanGrabBI.
19. this part is needed if you want animations to play for your characters. Add a new function in the interface and name it CanGrab_BI. after if you compile and go down to the inputs tab at the bottom rename that to CanGrabBI.
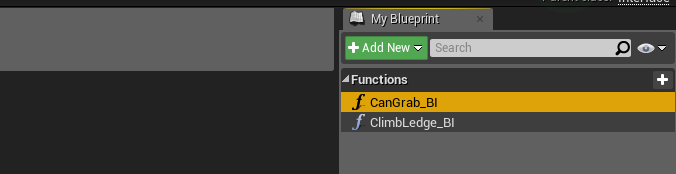
Dont worry about the ClimbLedge_BI function, right now I'm just showing you how to get your character to hang on a ledge. an interface blueprint will be shared with the animation blueprint so that we can play animations so its not a must
20. back in our character blueprint we're going to create a custom event and call it "Grab Ledge". While we're here lets make a boolean variable and name it "Is Hanging" we'll need it
21., from Grab Ledge node we're going to call in the CanGrabBI then to a Set Movement Mode Node, after the Set Movement Mode we're going to set the IsHanging node there
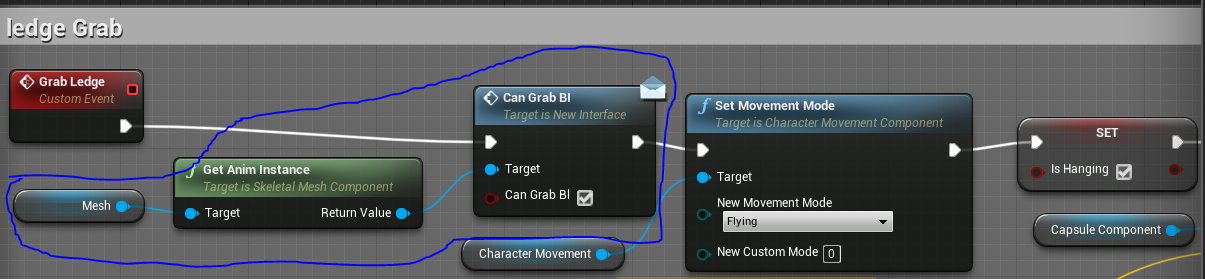
The Blue nodes are optional for now like i said they are needed for changing animations. also new movement mode in the set movement mode needs to be set to flying
22. after the Is Hanging set we're going to add a move component to that goes into a stop movement immediately, because we want the player to stop on a ledge
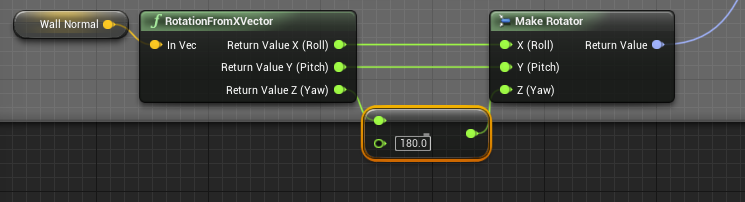
23. for the target relative rotation, get the Wall Normal variable we made and drop it into a RotationFromXVector. right click on the return value of the XVextor and split it, you will have three nodes Roll(X), Pitch(Y), and Yaw(Z), plug the Roll and Pitch into a MakeRotator node while the Yaw goes to a float - float. from the the float - float got the the make rotations Yaw value, the Value in the float - float is set to 1, change it to 180. the character will snap to the wall instead of floating at a 45 degree angle.
22. after the Is Hanging set we're going to add a move component to that goes into a stop movement immediately, because we want the player to stop on a ledge
23. for the target relative rotation, get the Wall Normal variable we made and drop it into a RotationFromXVector. right click on the return value of the XVextor and split it, you will have three nodes Roll(X), Pitch(Y), and Yaw(Z), plug the Roll and Pitch into a MakeRotator node while the Yaw goes to a float - float. from the the float - float got the the make rotations Yaw value, the Value in the float - float is set to 1, change it to 180. the character will snap to the wall instead of floating at a 45 degree angle.
24. in the relative Location node we're going to make a vector x float node. this would be better to show you first.
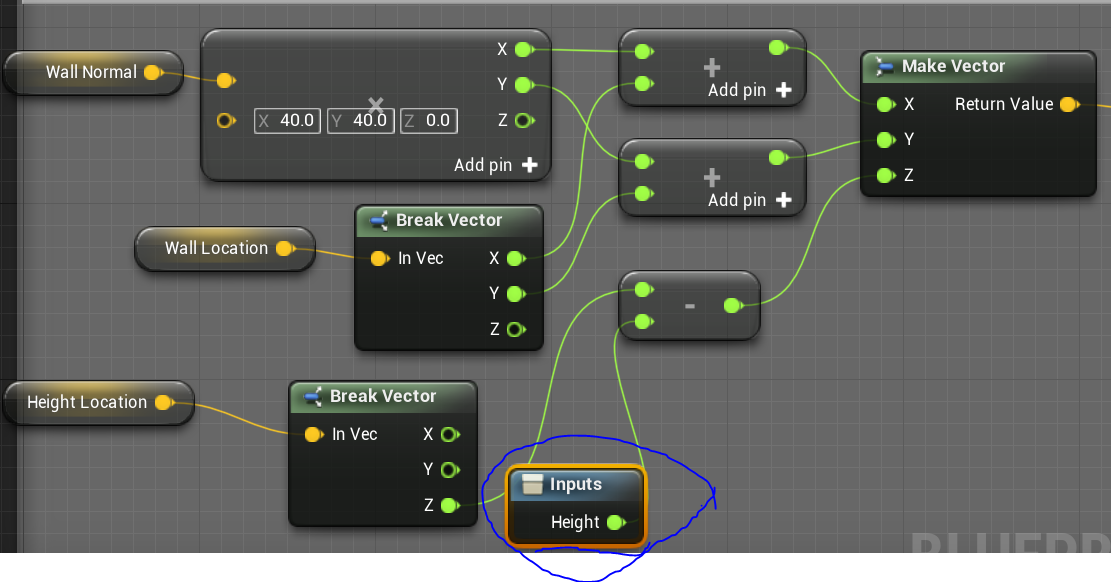
this uses all three vector nodes we made and uses the X and Y from the Wall variables and the Z from the Height. the X and Y are added with each other for the normal and location, however the Normal is being multiplied first. the Height is being subtracted to indicate where on the ledge you are. the input i have there is change the value when it is in a macro. if your convert this to a macro you save some working space and can still change the value easily
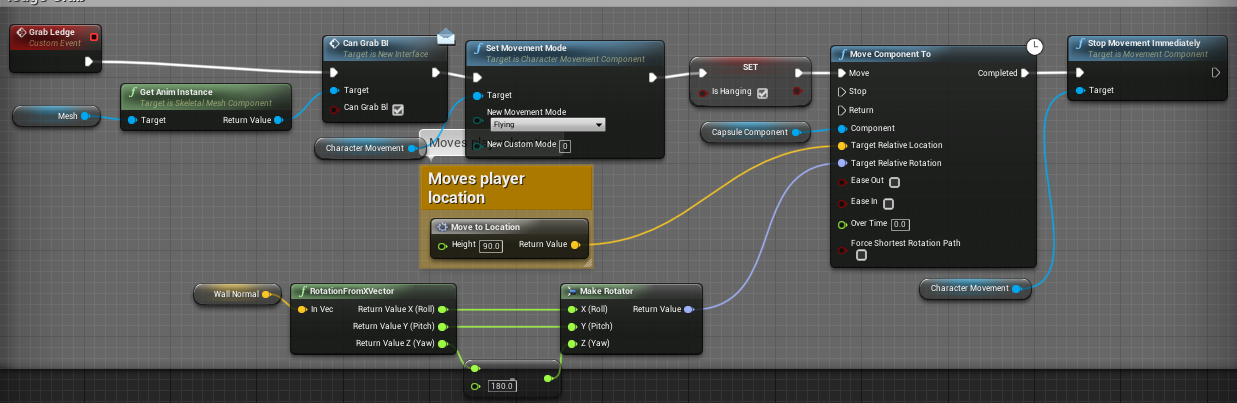
Now when you test the game you should snap to the ledge when you jump towards it. If it does not work, make sure your collision is set to custom on your block and have the trace ledge turned on. also if it doesnt work that also would be because the CanGrabBI isnt calling anything, if thats the case, just drag the event node straight to the Set Movement Mode.
Lets make it so that the player can let go of the edge, so earlier i said to put the grab in the inputs, now we're going to use it.
25. Lets make a new custom event and name it "Exit Ledge" plug the node into a Set Movement Mode and have it set to falling, plug that it IsHanging set. set IsHanging to off. CanGrabBI can be put here for animation as well you dont need it for this tutorial.
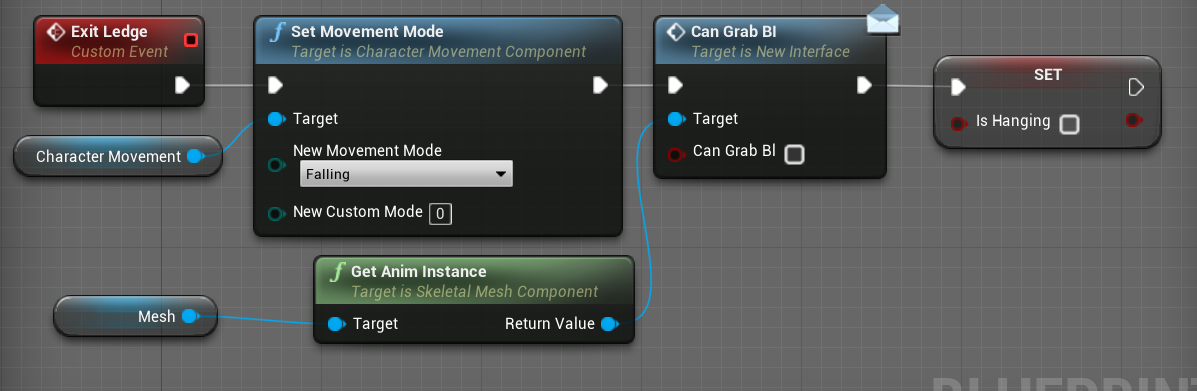
this is it with the CanGrabBI.
26. lets add our InputAction Grab event and branch it on the release key. Put the IsHanging boolian in the Branch so that when it is active we will let go. From the Branch True variable type Exit Ledge and it will work.
26. lets add our InputAction Grab event and branch it on the release key. Put the IsHanging boolian in the Branch so that when it is active we will let go. From the Branch True variable type Exit Ledge and it will work.
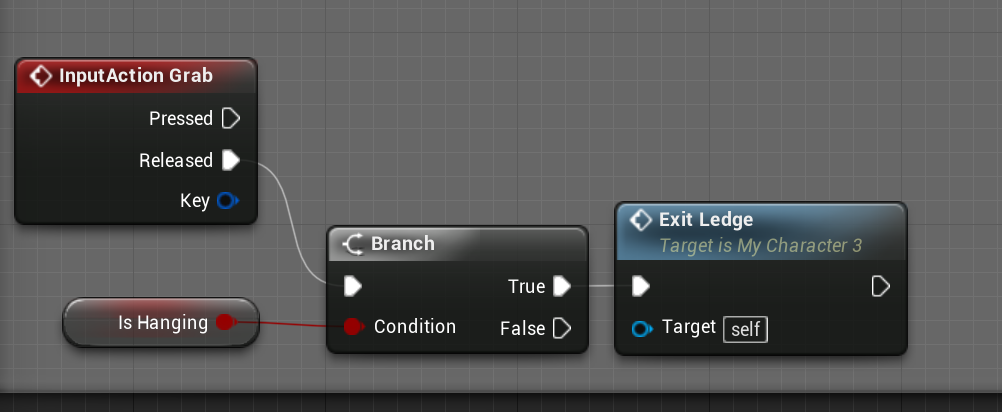
I have it set on release because i want to make it so the character will hold on with a button instead of it being automated. release will only activate when you press and let go of the button
thats it for the Hanging BluePrint
thats it for the Hanging BluePrint
